Thursday, November 28, 2013

Thankful

Thanksgiving Day always serves as a nice reminder of the importance of gratitude.  We live in such a busy, go-go-go, society that it's really hard to remember to stop once in a while to give thanks - especially when thankfulness is such an undervalued attitude.  

Cynicism is too often over-appreciated, while those of us who value kindness and positivity are labeled as "naive" or "cheesy."  Complaints dominate social media and there always seems to be a sick competition to determine "who has it the worst."  Why do we want to be miserable?  Why do we compete for "most funerals attended" or "most stressed out?"  Can't we focus on the good things in life?  Every day that we are alive is a wonderful and amazing miracle.  Shouldn't we be thankful for life's blessings every single day? 

I challenge my friends and family to take a moment every day - not just today, not just the month of November - to reflect deliberately and sincerely about what you are grateful for.  I try to commit to a minute of gratitude every night before I go to sleep.  Call it prayer, call it meditation... whatever your beliefs, you can't ignore the importance of giving thanks for what you have. 


In the spirit of Thanksgiving, I would like to share the things that I am thankful for today and every day.

My sweet, intelligent, funny little boy - and the blessing of being his mommy

My husband and our loving marriage

My supportive, loving and generous parents

My caring, fun and amazingly talented brothers - and the friendship we all share

My soul mate dog and her copious loveable quirks


Our strange and hilarious, affectionate puppy
Our precious new baby and his persistent kicking

Monday, November 4, 2013

Packing for a Second Hospital Delivery

My due date is sneakily creeping up on me with this second baby.  When I was pregnant the first time, I felt like the weeks and months dragged on in a cruel, eternal sort of way.  This time things have progressed as though someone pushed the "fast-forward" button on our old VCR: time is moving quickly and fuzzily and who knows when I will have a moment to sit back and actually enjoy this pregnancy?! I hit the 30 week milestone already - that's 3/4 of the way! I'm 75% done! And I know deep down that, with all the upcoming holidays and events, the next 10 weeks will speed by even faster than the first 30.

So, as my due date seems to be tip-toeing up without warning, I figured I should pack my hospital bag in preparation.  I've already begun packing for my Little Peanut, since he'll be staying with Nana and Papa while we are in the hospital.  He has fewer requirements, aside from a very lengthy packet that I typed up describing his daily schedule, eating habits, emergency information and Christmas wish list.  Not like my parents are clueless about this stuff... they watch him frequently.  But he's never been away from home without me overnight.  His bag will also include some spare clothes (and some sort of "big brother" shirt to wear when visiting the new baby), his blankie and bear, diapers, etc. The same items I would pack for any overnight trip.

Jared's bag will be up to him (he's a big boy!), but I will have some suggestions for him based on our last hospital stay:

The Daddy Bag:

  • Sweatpants and sweatshirt - I kept my delivery room extremely chilly last time, and Jared was so sleep-deprived that his body ceased to regulate its temperature.  He ended up shivering through the last few hours of labor.  
  • Water bottle and snacks - My parents will surely treat Jared to some fast food while I'm in labor (like last time) but in between meals, he will need food and water.  I will pack some (peanut-free) granola bars and beef jerky for him to munch on.  I would also consider bringing energy drinks for him, since he doesn't drink coffee.
  • Phone charger and headphones
  • Gum - Fresh breath is best
  • Entertainment - For Jared this means packing his portable gaming device, but it could also mean a book, magazines, tablet, laptop, etc.
  • Toiletries - He never showered at the hospital (he had some time after delivery to drive home and take care of some business, including showering), but he was glad to have brought some deodorant and a toothbrush/toothpaste to freshen up before he had the chance to venture home.  Also consider packing some basic medicine for Daddy (for headache, tummy ache, allergies).
  • Change of clothes - He will likely bring a couple extra shirts, undershirts, socks and undies to change into when he starts smelling ripe. 
We are lucky that my parents are in town (like, beyond lucky sometimes) because anything Jared forgets, they can bring him.  Or they can keep me company while he runs home.  One thing I never really touched on in my previous delivery posts was the fact that I don't want to be alone in my hospital room. Not for a moment.  This stems from bad previous hospital experiences and the fear that, at any time, something can go wrong.  And I'm the kind of person who likes to have someone I trust around as backup - just in case.  Some women probably relish any time they get alone in the recovery room with Baby.  I'm not one of those women :)


Speaking of previous posts.... I posted a while back about how I would pack my hospital bag for the second baby (it can be viewed here), but I wrote this entire post long before I actually got pregnant for a second time.  Now that I'm actually thinking about being in the hospital again, I thought it might be prudent to revisit this list with careful consideration.  For some more perspective from a mom who has already gone through the birth experience once before, check out my post "Second Time Around Makes Me a... Pro?".  


I will state again: this list has been written with extremely careful consideration.  I'm not about to tell you exactly what kind of pajamas to pack, and I'm no expert on labor and delivery.  This is MY list that I'm sharing with my readers - and my thought process behind each decision.  Get ready for some serious detail!

No Need to Bring:
Diapers, wipes, maxi pads, disposable underwear, swaddling blankets, nursing pads, baby shampoo, booger sucker - the hospital provided much more of this type of stuff than I expected.  I wished I had packed an extra bag to bring all that stuff home with us though!!  Check with your hospital to find out what will be provided, and prepare for some "free" take-home supplies by bringing a spare bag or box.  Also, don't worry about bringing any kind of "entertainment" for yourself (book, laptop, knitting needles, etc.) because any downtime you have will be spent sleeping!

Definitely Bring: 
Labor Comforts -  everyone is a little different, so think about bringing items that you would want around for comfort if you were, say, sick in bed.  Labor is a similar situation, especially if you have an epidural or don't have the option to get up and walk around. 


  • Robe
  • Slippers or socks - for walking the halls. Hospital floors are chilly.
  • Hair ties/pins/headbands - to keep sweaty hair under control. 
  • Water bottle
  • Music & headphones - I'll use my iPhone, so I will make sure to pack my charger too. 
  • Chapstick  
  • Focus Item - The hospital doesn't allow anything that burns (candles, incense, etc) but other labor support items can be really helpful.  For ideas, check this site, read some books, or take a birthing class.  I plan to have an epidural again this time, but I'd like to bring a "focus item" (something to remind me that all my hard work will result in a precious little baby in my arms) to help me through labor. 
**Your pain management is a very personal choice - do your research and take careful consideration before making your birth plan, and try not to judge others for their childbirth decisions.  I repeat, it's a very personal decision for every woman.** 

Recovery Comforts -  even though post-birth recovery is a time of bliss and excitement and you will likely be staring contentedly into your newborn's perfect face, it's also a time of  discomfort (and pain) and, again, similar to being sick in bed. 

Not pictured: pillow, going home clothes

  • Pillow - with a non-white pillowcase to distinguish it from the hospital pillows
  • Nightgowns or Pajamas - preferably grungy ones that you won't mind staining.  Also keep in mind that you will be examined every couple of hours, so access to your Lady Zone is pretty crucial. Easy access to your Milk Zone will also be important if you choose to breastfeed.  And there is always the possibility of needing a C-Section, which would leave an incision in the lower abdomen.  Pants that are tight against your lower tummy won't be comfy, so take that into consideration as well.
  • Big Undies - again, that you won't mind staining.  The hospital provides disposable underwear, but it's not very comfy.
  • Clothes to wear home - I plan to choose reallllllllllly comfy maternity clothes, since I don't expect to be much smaller leaving than arriving.  I will also need a warm coat in January - don't forget to think about what the weather will be like when you leave the hospital!
  • Toiletries:
    • toothbrush and toothpaste
    • shower supplies
    • hairbrush (the hospital provided a blowdryer)  
    • makeup (you'll be happier to pose for pictures if you feel you look your best)
    • facial wipes or face wash
    • deodorant
    • lotion 
    • soft toilet paper (the hospital gets their toilet paper straight from the tree... meaning: it's not soft.  I plan to bring my own, cushy TP from home, since my Lady Zone will be sore already)
    • prenatal vitamins (if you choose to breastfeed, you'll want to continue taking these for the duration) 


everything packed along with makeup bag


Nursing Comforts - Breastfeeding your baby is a choice - not a requirement.  There is a lot of pressure to be a nursing mom, but it is ultimately up to you.  Many of the best parents in the world opt to bottle-feed their babies. But if you do choose to breastfeed, many hospitals, like mine, are very supportive of this choice by making it standard practice for your baby to "room in" (allowing baby to sleep in the room with you at all times).  I also had no fear of the nursing staff giving my baby a pacifier or a bottle without my permission - this is likely practiced at your hospital as well.  And if you aren't sure about your hospital's policies and procedures regarding these things, don't be afraid to ask.  I hope to give myself the opportunity to successfully breastfeed my second baby, so I will bring:

Not pictured: Boppy

  • Nursing bra or supportive tank top - it's nice to feel like your Milk Zone is well-supported if you plan to have visitors
  • Lanolin - baby may not latch properly right away, leaving you with sore nipples
  • Boppy or other nursing pillow - this is a bulky item that I chose not to bring the first time, but wished I had.  Keep in mind that poor positioning of the baby during breastfeeding can potentially be the single breaking point when it comes to having a successful nursing experience, and hospital pillows may not give you the kind of positioning you'll need.
  • Nursing cover (optional) I got my yellow one from this website!


Tech and Other Essentials

Not pictured: Camera, treats for nurses
 
  • Camera and charger
  • Video camera and charger (Optional. My camera and phone happen to have a video function, so I won't be bringing my camcorder this time.)
  • Phone chargers 
  • Cash - for snacks and meals
  • Notebook - for recording thoughts & feelings, as well as important information and instructions from the nurses/doctors
  • Insurance information (for you and for the new baby)
  • Extra bag or box - to bring home the hospital-provided diapers, as well as any gifts or flowers you receive
  • Gift for older sibling "from the new baby"
  • Treats for the nurses - many people I know have recommended bringing cookies or candy for your nurses.  I didn't even think to consider this the first time.  And I may or may not have the time/energy this time, but I do like the idea of thanking my nurses with something sweet.


For Baby   


For the hospital stay

For the trip home

  • Outfit to wear home
  • Socks and mittens - or consider baby nail clippers to prevent scratches
  • Vaseline - coating baby's bottom will make it easier to wipe off those first few sticky meconium poos
  • Onesies or sleepers to wear in the hospital - we didn't dress Little J while we were staying in the hospital with him - just swaddled him in his diaper.  But this second Baby will be born in the dead of winter, so I will pack some warm, snuggly clothes this time.
  • Hat - my hospital provides a hat for baby to wear home, but I will pack a spare anyways 
  • Weather-appropriate travel supplies - warm hat, extra blankets, car seat cover (like these)
  • Car seat (strapped into the car)

I packed most of these items (the ones I don't use on a daily basis) into my small duffel bag.  A suitcase would do just fine as well, but I like the option to have my beefcake husband masculinely swing my bag over his shoulder as we walk into the hospital... if you would like a bag suggestion, this is the bag I'm using for my stuff and baby's stuff.  The items that I haven't packed yet are written on a list so that I can throw them into the bag at last minute - things like my phone charger, robe, wallet, etc. that I can't really pack away this early. 

I will reiterate: this is my personal list.  My suggestions for Mommies-to-Be who want some advice for packing.  Please note that I am not a doctor, nurse or midwife - nor am I a professional of any kind.  I'm just an overly organized Mommy who likes to be helpful :)

Happy packing!

Sunday, October 27, 2013

A Harry Potter Family


Halloween is normally a pretty big holiday for me.  I'm the kind of person who likes to have more than one costume each year - you know, a costume for every party or every day of Halloween week (or something like that).  The first year that Jared and I were dating I somehow convinced him to dress up in a full pirate costume - makeup and all.  Looking back, it's abundantly clear that he was only willing to dress up because he thought it would impress me... and it did.  But ever since that first Halloween together, each year his costume preferences have become more and more limiting.  It started with, "no makeup or masks," and has finally turned into little more than, "just a T-shirt, thanks." Luckily for me, my young chap is a little less picky about his costume...

I may have mentioned at some point the magnitude of our Harry Potter fanhood.  I wasn't exaggerating.


As a big, huge pregnant lady, my costume options were a little more limited this year than in the past.  Jared suggested that I could go as the Death Star... which, after my initial reaction of insult, sparked an idea.  I could dress as anything ball-shaped.  I thought of dressing Little J as an astronaut and making an "Earth" costume for my pregnant belly.  But then I thought of this:


The Golden Snitch! This inspiration led me to the idea for Jared's costume as well.


And of course, my Little Peanut would have to go as the Chosen One!


This year's Halloween is different than other years for several reasons: I'm pregnant (and tired and busy and moody), Little J is a walking running maniac, and we are on a tighter budget than usual since Little Baby #2 will be here in about two months.  With coupons and store sales, all three of our homemade costumes cost me less than $20 this year - which has to be some kind of record for me!  Huzzah!  Here's how I accomplished this feat:

The Marauder's Map:

I bought Jared a white T-shirt at Hobby Lobby (on sale) and found a black fabric pen (bought with a coupon).  The white was really really white, and didn't look nearly antique or distressed enough to be an authentic-looking Marauder's Map... so I dyed it.  I quite simply dunked the whole shirt in a bowl of strong coffee for 30 minutes or so (then washed it, since Jared is nauseated by the smell of coffee).  It didn't end up as off-white as I hoped, but it was better than the stark, paper white that it started as. 
 
 
I found some pictures of different views of the map (from the movie) online and made a collage of my favorite images on the front of the shirt.


Then, on the back...


Here's the stud wearing my final product! (For some reason he chose to flex all his muscles for this photo... not a typical Jared thing to do, but resulted in a super adorable picture!)

 
The Golden Snitch:

I would be lying if I told you that this costume was easy.  Or quick.  But it was inexpensive to make.  I started with a black T-shirt from Hobby Lobby (on sale) and bought these sparkly and iridescent canvas sheets, as well as some gold fabric paint.  I had fabric glue already, so that part was free for me :)


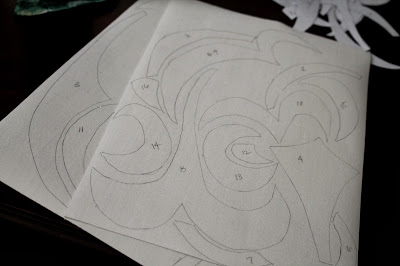
I drew a design for my Snitch, based very loosely on the Snitch from the movies (which wasn't nearly as swirly or "pretty" as I wanted mine to be.  See bottom corner of the piece of paper).


I measured by belly's width and height so I would have a good idea of how big my final design needed to be, then drew a scale pattern based on my original design.


Then I cut the pattern pieces out.  I made sure to number each one, corresponding with a matching number on my original drawing (so that I could more easily piece the whole thing together on the shirt - like a puzzle map).


I traced my puzzle pieces upside-down onto the backs of my gold sparkly canvas and cut them out (also numbering these).   I traced them backward onto the back so that they wouldn't end up inverse when I flipped them back over.


The final step was to arrange the gold pieces on my shirt and glue them down.  I had to rearrange the pieces several times in order to create the exact shape I wanted.  Then I used my fabric paint to add embellishments to the gold pieces (and in between them). I added wings, which ended up looking like they were fluttering in my armpits, but still had the right effect.


Baby Harry Potter:

This costume was easily the most simple and inexpensive of all three.  Little J had a white collared shirt already, and we just dressed him in some comfy pants to complete the Hogwarts uniform.  I had some scrap fabric that I used to "quilt" a striped Gryffindor tie for the Dude.   I attached it to a strand of elastic (to make things easy - you know... toddler).


I had an old black skirt that I've been hanging onto for just this kind of project, which I cut up using my very limited knowledge of pattern-design.  I measured Little J's shoulder width and arm length to ensure the robe wouldn't end up hanging off of his tiny body like a tent.


To make his wand, I rolled a brown piece of card stock paper into the shape I wanted and taped it closed.  I thought of using a drum stick for his wand, but after imagining the kind of damage such a tool could do when smacked against my knee caps or the dogs' heads, I went with something a little less harmful.  


I grabbed my trusty glue gun and swirled on some squiggly designs to the handle.  After it dried I painted some brown paint over the top to mask the tape and glue.


He wasn't nearly as thrilled with this new toy as I expected him to be.  He certainly didn't have much interested in casting any spells right away...


I attempted to make some Harry glasses using black pipe cleaner.  They turned out adorable, but the Peanut wasn't impressed.  Zooey, as always, was a perfect model...


The final costume cost me $0.00, since I used only supplies that I already had around my house.  Goes to show... saving ill-fitting garments for years can eventually pay off in the form of "free fabric!"


Being a wizard was so much fun!


The whole family:

And a cute picture with Pops, because I just can't resist....
 

Thursday, October 24, 2013

Ruffled Apron Tutorial

Yes! I know this post was promised weeks and weeks (and months) ago, but I finally got a chance to make another apron to share! This time I photographed the steps as I went so that my strange and confusing instructions might make a little more sense.  I must preface this tutorial with a disclaimer: I don't have a pattern for this project, and I never seem to use the same dimensions more than once.  Truthfully... I just sort of eyeball the whole thing (which isn't very nice of me and I yell at other bloggers who do just that in tutorials!)

Additional disclaimer: Due to updates to the Google+ Picasa Photo Editor, I can no longer add text to my photos.  My "Buckley House" branding will be gone for now - until I find a photo editor that I like.  Also, due to my frustration with this discovery and my innate stubbornness, I chose to not edit my photos at all (call it a rebellion?) so... they suck.  Apologies!

This is by no means a difficult project - I'd say, even with my lame instructions, that it only requires moderate skill.  It also requires very little fabric (I always use scraps for most of it).

The largest pieces of fabric needed are for the base/back of the apron itself and for the tie (that goes around your waist).  My rough dimensions for the base of the apron tend to be about 14 x 22 inches.  I typically use a neutral or dark color - this fabric will not really be seen from the front if you add ruffles the whole way up from the bottom.  I always hold the fabric up to myself to make sure it covers me from hip to hip and is long enough to keep counter-crud off of my pants.

Hem the edges of this piece of fabric about 1/4 inch (I double hem so that there won't be any risk of fraying edges)


The next thing I do is pick out a few coordinating fabrics for the ruffles.  I usually choose 4 fabrics, but it really depends on how tall you want your ruffles to be.


Do some simple math and calculate (adding about 1/2 an inch for hemming and another inch for overlap) how wide the ruffle strips need to be to cover the apron from top to bottom. For example, my apron base ended up being 12 inches tall after I hemmed its edges - in order for 4 ruffle strips to cover this, I cut them to be about 4-4.5 inches wide.  (12 inches divided by 4 fabrics = 3 inches each, plus 1.5 inches each for hem/overlap = 4.5 inches)

In order to determine the length of the strips, measure the width of your apron and add "half again more" (a phrase my mom always uses...) so since my apron was about 22 inches wide, I cut my strips to be 33 inches long.  (22 divided in half is 11.  22 + 11 = 33).  This allows for gathering to create the ruffled appearance.

I didn't take a photo of this part of the process... sorry :(

Next, I hem all the strips 1/4 inch (double hem if you want), but only on three sides, leaving one of the "long" edges raw.  This is the edge I will end up gathering, so I simply sew a zigzag down this edge to prevent too much fraying.  It could be hemmed, but I'm lazy. 


Next, gather that raw edge.  My technique for achieving this is to sew a straight stitch the length of the strip using the longest stitch setting my sewing machine will allow (about 4).   It will start to gather as you sew, but will probably need to be pulled even more to fit inside the width of the apron, so leave long tails of thread!  To gather to the desired length, pull the top thread tails on both ends.  (A wonderful tutorial for how to gather can be found here)


Then pin your ruffle to the apron back.  I usually start from the middle and work my way to the edges, so it doesn't end up too heavy on either end.  I always pin all of my ruffles before sewing any of them down in case I need to do any adjusting.


Overlap the ruffles by about an inch so that the raw edge is well hidden.  Then sew them into place!


The hardest step for me is always the waist band.  I usually have to piece two lengths of fabric together for this part because it is so long.  Measure around the part of your waist where you want the apron to be tied, then double that length (this measurement can be adjusted to your taste, depending on how long you want the ties to be). 

Once you have this measurement (let's say it's 60 inches), cut a strip of fabric 3-4 inches wide by 60 inches long. Fold and press the strip in half down the whole 60-inch length ("ugly" sides together) then fold the edges under and press and sew.

(You could also sew the strip "pretty" sides together and turn, but that requires turning 60 inches of fabric inside-out.  And trust me, that is not fun).


Once sewn, line up the middle of the waistband with the middle of your apron.  The top ruffle should still have a raw edge.  Make sure your waistband covers the raw ruffle edge completely and sew onto the front.  I always struggle with this part and the technique I use for this step varies from apron to apron (I know, not nice!).  The key is to make sure you don't have any raw edges showing, which usually requires sewing along the top and bottom of the waistband.  Good luck! 


I couldn't really use my pregnant self as a model, so my dresser had the honor of displaying the final product!


To see some of the other aprons I've made, including a couple Kid-Sized ones, check out my previous post here