Thursday, May 16, 2013

Meal Planning for the Drive-Through Addicts

As I'm sure you could tell, I've been much too busy for blogging lately.  May is the craziest month in the Buckley House - last year we were gearing up for our first baby and the year before that, May was a busy wedding planning month.  This year we have an adventurous (almost)toddler, two wild puppies, a house, yard, etc.

When every weekend is full, we have to make a special effort to be productive during weekdays.  This has always been difficult for me - I love my downtime, especially when Little J is napping and the whole house is quiet for once.  But because the Babe is so much more mobile these days, I have to provide him almost constant supervision (plus, I really love playing with him!) so I have to utilize naptimes more efficiently.

Today, I put my 45 minutes of morning nap/quiet time to good use.

Jared and I have always struggled (for the past 4 years) with meal planning.  Every night we play the "what do you want for dinner?.... I don't care, what do you want?" game.  This game always lands us in the same place:  Taco Bell.  Or Panda Express.  Or Chick Fil-A.  Regardless of the restaurant, we always seem to find excuses to forget any pre-planned meals at home and go through a drive-through.  "This needs to end!" we say every week.  Our wallets (and thighs) are suffering, but mostly I just can't handle the guilt of being such bad Eating Role Models for our child.  So, for reals this time, it ends now!

Here is the first part of my brilliant solution:

Weekly meal planning made easy.  It's just a start - to get us back into the habit of eating most of our meals at home.  I decided we would be more likely to succeed if I kept things simple and easy for now.  Instead of planning exactly what I'll cook each weeknight, I will plan for certain genres of meals.  "Pasta" could mean spaghetti, or mac and cheese, or casserole, or Top Ramen.  I'm hoping this will ease us into a lifestyle of successful meal planning.


I used some scrap paper I had on hand and cut strips for my weekly calendar, as well as some little squares for the meals


I had an old magnet that I cut up into pieces and stuck to the backs of my squares with double-sided tape.


I also attached magnets to the backs of my week strips.


And hung them in plain sight on the fridge! The meal squares can be moved around depending on our moods any particular week.  Or I can add new ideas if I choose. 


I also made a weekly calendar for chores (because I'm a procrastinator and I always put off cleaning the bathrooms).  This way I can hold myself accountable.  Do the chores on their assigned days!

Tuesday, May 14, 2013

Peach Cupcakes

I am nothing even close to a cooking expert, but every now and then I come across awesome recipes that I just have to share.  I found this gem while searching for peach desserts, and they are hands down the best cupcakes I have ever, ever made:

The original recipe can be found on this awesome blog: Cathlin Cooks... But Mostly Bakes!


Now, I passed up the food coloring step (mostly out of laziness) so my cupcakes didn't turn out quite as colorful as hers.  But I like to think that my cupcakes were just  as tasty!


I added my own little flair to these babies by topping them with candied pecans.  And trust me, the "pecan bite" was the yummiest bite of the whole cupcake.


I wonder if the recipe could be tweaked by using different kinds of fruits.  Like... blueberries? I'll let you know how my experimentation turns out!


Monday, May 13, 2013

Our (Low Budget) Backyard Project

At the end of March we celebrated the 1-year anniversary of owning our house.  I still feel secure in our selection- this house is just the right size for our growing family and the location is great.  And, since neither Jared or I are super "handy" when it comes to demolition or construction, this house was a perfect fit: no major "fixer-upper" projects! 

We will eventually make some upgrades, of course.  Our kitchen counter was trashed by the previous (and apparently pyromaniac) owners.  And I'd love to add crown molding in every room :) 

But we had one rather urgent upgrade to make.  This house was once an infamous Model Home, which for some reason meant that it was built with only a 2x2 foot square of cement for the backyard patio.  Jared and I were unable to stand side by side on this "stoop," let alone grill delicious steaks or enjoy a glass of wine or watch Little J frolic in the grass.  So we had to do something, even though we had very little money budgeted for such a project. 

So we began clearing the rocks to make way for our tiny little patio addition.  

Zooey watches from indoors
And Little J watches from his shady lounge chair


We purchased 40 square feet of these lovely pavers - and at 17 pounds apiece, we got quite the workout moving them from car to yard.  I'll spare you the boring details, but here's what we accomplished spending under $150 (with only a few hours of labor):

We used chairs that we already had, saving us about $40
Hobby Lobby had outdoor decor 40% off this week, saving us even more $!


Our puppies enjoy a little stroll on the new patio.  


And Jared enjoys a little time with his grill.
 

The more boring aspects of our yard makeover involved some potted plants, wild Tentacula removal, and tree installation!

This horrible bush (which I have dubbed "The Tentacula") had to go.  Immediately.  I just knew that someday it would house a family of snakes, and that thought made me sick enough to rip the whole thing out as soon as I could.


We were also itching to improve the view from our back door. This is the gorgeous landscape that we have enjoyed for over a year:

BEFORE
AFTER
We hope our little peach tree will grow fast enough to block the street view from our sight.  Notice that the Uhaul in the "after" picture is at a different house than the "before" picture.  See why we want to create a little privacy for our back door?

And finally, I moved the lounge chair that the previous owners abandoned in our side yard to the front porch to accompany my new potted hydrangeas.


 Someday we will save up enough money to build a nice deck.  Or a new house (wink, wink).  But until then, we are thrilled to have a little space to sit outside and enjoy our backyard.

Monday, May 6, 2013

Frozen Yogurt Bites

We've been so busy lately over here at our house. Here's what we've been up to the past couple weeks:

Shoveling snow in our driveway (approximately 14 times)
Moving furniture
Planting a tree
Laying pavers
Watching Yo Gabba Gabba
Filling holes that Leia has dug in the yard
Wrangling the crawling, standing, almost-walking babe
Hanging pictures
Picking paint colors
Fixing billing errors over the phone with our insurance agent
Soothing Little J when his teeth hurt

Notice how "blogging" isn't on that list?  Yeah... sorry!  But I did manage to take some photo documentation of some of our projects.

I found a (somewhat helpful) solution to The Peanut's teething pains.  He's not a fan of teething rings (but Leia is a HUGE fan, we have discovered, when the babe throws them to her on the floor).  He is, however, a major fan of EATING. 

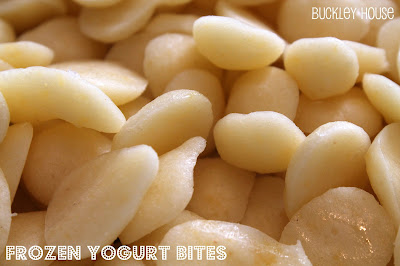
I made some frozen yogurt bites for Little J to munch on. They are healthy and sooth his sore gums.

Ingredients:

Any type of yogurt (I used "plain" because that's what I had in my fridge)
Optional: Fresh/Pureed Fruit


I blended all my ingredients together lightly in my Baby Bullet, then poured the mixture into a baggy.


By cutting a small corner off the baggy, I was able to squeeze the yogurt out in small drops onto wax paper (the same way I might frost cupcakes in a jam).


I ended up filling several sheets of wax paper with yogurt drops.


These little babies freeze quickly, so I was able to pile the wax paper sheets on top of each other as I went.  Don't judge the interior of my freezer... there's no reason we should have 2 lonely Eggo Waffles stashed at the back, uneaten.  But now I know they're there, so they won't last...


Once completely frozen, the yogurt drops simply peel off the wax paper. Easy peasy!


They are easy for the babe to pick up (and just as easy for him to toss on the floor to feed the dogs, like he often does).


See those tiny little bottom teeth?  The twice-as-big top teeth are making their debut any day now, and Little J loves to remind us how much they hurt.  Poor chap.


Remember little Leia?  Not little anymore... And certainly not done growing either!  She's been assisting the babe in cleaning his tray at mealtimes.   I don't think he minds.


I store these yogurt bites in the freezer in an airtight container.  They should keep for a couple weeks, but they do melt quickly, so I don't ever leave them out on the counter for very long.  And I only give the babe a few at a time, because once they start melting, they smear everywhere.