Sunday, October 27, 2013

A Harry Potter Family


Halloween is normally a pretty big holiday for me.  I'm the kind of person who likes to have more than one costume each year - you know, a costume for every party or every day of Halloween week (or something like that).  The first year that Jared and I were dating I somehow convinced him to dress up in a full pirate costume - makeup and all.  Looking back, it's abundantly clear that he was only willing to dress up because he thought it would impress me... and it did.  But ever since that first Halloween together, each year his costume preferences have become more and more limiting.  It started with, "no makeup or masks," and has finally turned into little more than, "just a T-shirt, thanks." Luckily for me, my young chap is a little less picky about his costume...

I may have mentioned at some point the magnitude of our Harry Potter fanhood.  I wasn't exaggerating.


As a big, huge pregnant lady, my costume options were a little more limited this year than in the past.  Jared suggested that I could go as the Death Star... which, after my initial reaction of insult, sparked an idea.  I could dress as anything ball-shaped.  I thought of dressing Little J as an astronaut and making an "Earth" costume for my pregnant belly.  But then I thought of this:


The Golden Snitch! This inspiration led me to the idea for Jared's costume as well.


And of course, my Little Peanut would have to go as the Chosen One!


This year's Halloween is different than other years for several reasons: I'm pregnant (and tired and busy and moody), Little J is a walking running maniac, and we are on a tighter budget than usual since Little Baby #2 will be here in about two months.  With coupons and store sales, all three of our homemade costumes cost me less than $20 this year - which has to be some kind of record for me!  Huzzah!  Here's how I accomplished this feat:

The Marauder's Map:

I bought Jared a white T-shirt at Hobby Lobby (on sale) and found a black fabric pen (bought with a coupon).  The white was really really white, and didn't look nearly antique or distressed enough to be an authentic-looking Marauder's Map... so I dyed it.  I quite simply dunked the whole shirt in a bowl of strong coffee for 30 minutes or so (then washed it, since Jared is nauseated by the smell of coffee).  It didn't end up as off-white as I hoped, but it was better than the stark, paper white that it started as. 
 
 
I found some pictures of different views of the map (from the movie) online and made a collage of my favorite images on the front of the shirt.


Then, on the back...


Here's the stud wearing my final product! (For some reason he chose to flex all his muscles for this photo... not a typical Jared thing to do, but resulted in a super adorable picture!)

 
The Golden Snitch:

I would be lying if I told you that this costume was easy.  Or quick.  But it was inexpensive to make.  I started with a black T-shirt from Hobby Lobby (on sale) and bought these sparkly and iridescent canvas sheets, as well as some gold fabric paint.  I had fabric glue already, so that part was free for me :)


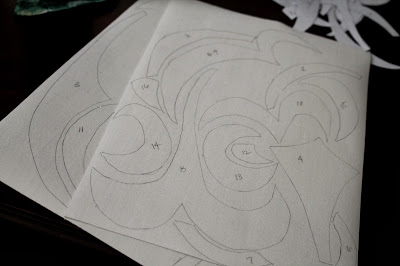
I drew a design for my Snitch, based very loosely on the Snitch from the movies (which wasn't nearly as swirly or "pretty" as I wanted mine to be.  See bottom corner of the piece of paper).


I measured by belly's width and height so I would have a good idea of how big my final design needed to be, then drew a scale pattern based on my original design.


Then I cut the pattern pieces out.  I made sure to number each one, corresponding with a matching number on my original drawing (so that I could more easily piece the whole thing together on the shirt - like a puzzle map).


I traced my puzzle pieces upside-down onto the backs of my gold sparkly canvas and cut them out (also numbering these).   I traced them backward onto the back so that they wouldn't end up inverse when I flipped them back over.


The final step was to arrange the gold pieces on my shirt and glue them down.  I had to rearrange the pieces several times in order to create the exact shape I wanted.  Then I used my fabric paint to add embellishments to the gold pieces (and in between them). I added wings, which ended up looking like they were fluttering in my armpits, but still had the right effect.


Baby Harry Potter:

This costume was easily the most simple and inexpensive of all three.  Little J had a white collared shirt already, and we just dressed him in some comfy pants to complete the Hogwarts uniform.  I had some scrap fabric that I used to "quilt" a striped Gryffindor tie for the Dude.   I attached it to a strand of elastic (to make things easy - you know... toddler).


I had an old black skirt that I've been hanging onto for just this kind of project, which I cut up using my very limited knowledge of pattern-design.  I measured Little J's shoulder width and arm length to ensure the robe wouldn't end up hanging off of his tiny body like a tent.


To make his wand, I rolled a brown piece of card stock paper into the shape I wanted and taped it closed.  I thought of using a drum stick for his wand, but after imagining the kind of damage such a tool could do when smacked against my knee caps or the dogs' heads, I went with something a little less harmful.  


I grabbed my trusty glue gun and swirled on some squiggly designs to the handle.  After it dried I painted some brown paint over the top to mask the tape and glue.


He wasn't nearly as thrilled with this new toy as I expected him to be.  He certainly didn't have much interested in casting any spells right away...


I attempted to make some Harry glasses using black pipe cleaner.  They turned out adorable, but the Peanut wasn't impressed.  Zooey, as always, was a perfect model...


The final costume cost me $0.00, since I used only supplies that I already had around my house.  Goes to show... saving ill-fitting garments for years can eventually pay off in the form of "free fabric!"


Being a wizard was so much fun!


The whole family:

And a cute picture with Pops, because I just can't resist....
 

Thursday, October 24, 2013

Ruffled Apron Tutorial

Yes! I know this post was promised weeks and weeks (and months) ago, but I finally got a chance to make another apron to share! This time I photographed the steps as I went so that my strange and confusing instructions might make a little more sense.  I must preface this tutorial with a disclaimer: I don't have a pattern for this project, and I never seem to use the same dimensions more than once.  Truthfully... I just sort of eyeball the whole thing (which isn't very nice of me and I yell at other bloggers who do just that in tutorials!)

Additional disclaimer: Due to updates to the Google+ Picasa Photo Editor, I can no longer add text to my photos.  My "Buckley House" branding will be gone for now - until I find a photo editor that I like.  Also, due to my frustration with this discovery and my innate stubbornness, I chose to not edit my photos at all (call it a rebellion?) so... they suck.  Apologies!

This is by no means a difficult project - I'd say, even with my lame instructions, that it only requires moderate skill.  It also requires very little fabric (I always use scraps for most of it).

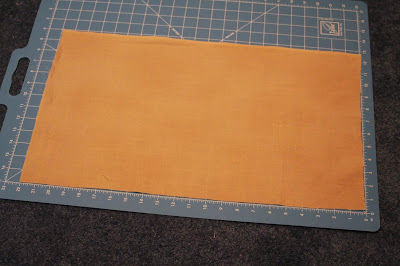
The largest pieces of fabric needed are for the base/back of the apron itself and for the tie (that goes around your waist).  My rough dimensions for the base of the apron tend to be about 14 x 22 inches.  I typically use a neutral or dark color - this fabric will not really be seen from the front if you add ruffles the whole way up from the bottom.  I always hold the fabric up to myself to make sure it covers me from hip to hip and is long enough to keep counter-crud off of my pants.

Hem the edges of this piece of fabric about 1/4 inch (I double hem so that there won't be any risk of fraying edges)


The next thing I do is pick out a few coordinating fabrics for the ruffles.  I usually choose 4 fabrics, but it really depends on how tall you want your ruffles to be.


Do some simple math and calculate (adding about 1/2 an inch for hemming and another inch for overlap) how wide the ruffle strips need to be to cover the apron from top to bottom. For example, my apron base ended up being 12 inches tall after I hemmed its edges - in order for 4 ruffle strips to cover this, I cut them to be about 4-4.5 inches wide.  (12 inches divided by 4 fabrics = 3 inches each, plus 1.5 inches each for hem/overlap = 4.5 inches)

In order to determine the length of the strips, measure the width of your apron and add "half again more" (a phrase my mom always uses...) so since my apron was about 22 inches wide, I cut my strips to be 33 inches long.  (22 divided in half is 11.  22 + 11 = 33).  This allows for gathering to create the ruffled appearance.

I didn't take a photo of this part of the process... sorry :(

Next, I hem all the strips 1/4 inch (double hem if you want), but only on three sides, leaving one of the "long" edges raw.  This is the edge I will end up gathering, so I simply sew a zigzag down this edge to prevent too much fraying.  It could be hemmed, but I'm lazy. 


Next, gather that raw edge.  My technique for achieving this is to sew a straight stitch the length of the strip using the longest stitch setting my sewing machine will allow (about 4).   It will start to gather as you sew, but will probably need to be pulled even more to fit inside the width of the apron, so leave long tails of thread!  To gather to the desired length, pull the top thread tails on both ends.  (A wonderful tutorial for how to gather can be found here)


Then pin your ruffle to the apron back.  I usually start from the middle and work my way to the edges, so it doesn't end up too heavy on either end.  I always pin all of my ruffles before sewing any of them down in case I need to do any adjusting.


Overlap the ruffles by about an inch so that the raw edge is well hidden.  Then sew them into place!


The hardest step for me is always the waist band.  I usually have to piece two lengths of fabric together for this part because it is so long.  Measure around the part of your waist where you want the apron to be tied, then double that length (this measurement can be adjusted to your taste, depending on how long you want the ties to be). 

Once you have this measurement (let's say it's 60 inches), cut a strip of fabric 3-4 inches wide by 60 inches long. Fold and press the strip in half down the whole 60-inch length ("ugly" sides together) then fold the edges under and press and sew.

(You could also sew the strip "pretty" sides together and turn, but that requires turning 60 inches of fabric inside-out.  And trust me, that is not fun).


Once sewn, line up the middle of the waistband with the middle of your apron.  The top ruffle should still have a raw edge.  Make sure your waistband covers the raw ruffle edge completely and sew onto the front.  I always struggle with this part and the technique I use for this step varies from apron to apron (I know, not nice!).  The key is to make sure you don't have any raw edges showing, which usually requires sewing along the top and bottom of the waistband.  Good luck! 


I couldn't really use my pregnant self as a model, so my dresser had the honor of displaying the final product!


To see some of the other aprons I've made, including a couple Kid-Sized ones, check out my previous post here


Decorating for Fall

Fall is usually my favorite time of year: the cool air, crunchy leaves, scarves and jackets, hearty homemade meals... And I love decorating for this season.  I find significance in the task of pulling down all my summery flowers and brightly colored vases and replacing them with warm orange and brown decorations.  The house feels cozy when it's full of pumpkins, and my mood always shifts in a more positive direction after this symbolic change in decor.

In past years I have felt the urge to buy more fall decorations to suit our current home.  This year we are A) living in the same home as last year, B) on a tighter budget, and C) pregnant.  So the amount of effort I desire to put forth has dwindled a bit... but I still wanted to decorate!

So this is how I added some fall touches to my "normal" decor without spending any money or using up too much of my pregnant energy supply.


Leave usual decor as is, just adding fall items here and there

Add a stem of fall berries to an existing arrangement

Add fall leaves to an existing wreath

Incorporate fall decor amongst usual items on a mantel

I love garlands!

The Autumn sign hanging above my mantel was a freebie - I snagged a nice piece of wood from my dad's garage, glued on some silk leaves (with Mod Podge, of course), and painted on a fall scene.  I used colors and texture that made me think of Autumn in the park.  Once dry, I stapled some twine to the back (with the heavy duty staple gun from my "lady's" tool kit from college) and hung it up!